ASP.NET Development Server and Linking to Remote Shares using Symbolic Links


In one of our recent eCommerce projects, we needed to access images stored on a network share within our website hosted on the ASP.NET development web server.

By default, the ASP.NET web server does not allow you to add virtual directories like IIS does.  This article will give you the steps to find your way around this problem

Our scenario deals with a web project in Visual Studio.  The site uses some images stored on a network share.  It is not effective to download and store all these images locally.  When users access the site, the images should be loaded directly from the network share.  For (e.g) When you access http://customsite/images/image1.jpg , the web server assumes that you have a images directory underneath your webroot and will look for a image1.jpg file.

When users access the site, we need to pull image1.jpg from a network share.  The technique to achieve this is really simple if you are using Windows Vista/7/Windows Server 2008.

Symbolic Links are a core feature of these later editions of Windows and help us achieve the above

Read more about Symbolic Links

Step1: Map a network drive to the remote network share.

image

Map the network share location that has the images to a drive letter in Windows

image

Step 2: Create a Symbolic Link using the mklink command

In our example, when the user requests an image it is loaded from the images folder.  This images folder is supposed to be found by the ASP.NET web server under the root folder of your web application.  For e.g. if your web application is located under “C:\inetpub\wwwroot\webapplication1” then your images folder is usually under the webapplication1 folder.

Important Tip: Do not create the images folder manually and try to map to the network share. Mklink will do that for you

Open a command prompt as an administrator

Type the mklink command as follows

mklink /d “Your Image Folder under your webroot”  “Mapped Network Drive Location”

In our example, it will be

mklink /d “C:\inetpub\wwwroot\webapplication1\images” W:\

Now you should see Windows Create a Symbolic link to the network share.

Browse to the site and you should see your images loaded from the network share

Important Tip: Be very careful, when deleting the Symbolic linked folder. You will be deleting the underlying files on the network share

How to share Windows Live photos with anonymous or non Windows Live users


If you are looking to share photos on Windows Live, things are very easy when sharing it with users who have Windows Live accounts

Sharing Photos with Windows Live Users

After you upload the photos onto Windows Live, scroll down and find the “Shared With": option.  Click on “Just Me” and Click “Edit Permissions” .

image

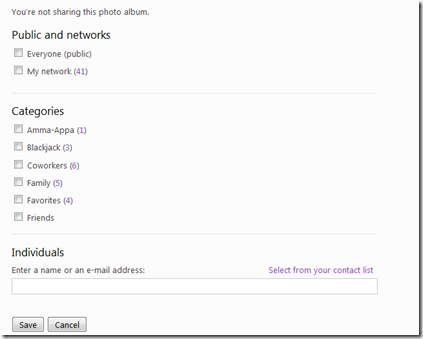
On the Permissions page, type in the name or email address of users or select from a category and hit “Save”

image

This process is fairly straightforward.  When users receive the link they click on it, login with Windows Live credentials and can view the album. 

However What do you do, when you want to share these Windows Live albums with users who dont have Windows Live accounts ?

Sharing Photos with Non Windows Live Users

To share your album with non Windows Live users, open the album in your browser and select the option to “Send a Link” under the “More” Dropdown option

image

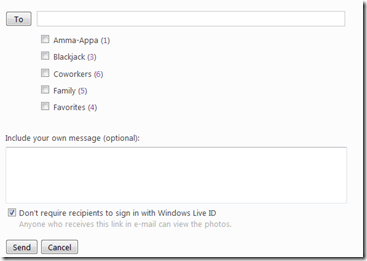
Now add your recipient email addresses and make sure the option to “Not require Sign in” is selected.  Users can now view the photos using the link they receive in the email.

image

Ideally this check box should have been part of the previous screen where we added Windows Live users.  Hopefully a future release will address this inconsistency.

Consuming External Content Types(BCS) in InfoPath Forms


Business Connectivity Services(BCS) is one of the coolest features in SharePoint 2010.  BCS helps us connect to Line of Business applications without writing a single line of code.

In this article, we will explore the process to connect to BCS and use the information within an InfoPath form.  A business scenario would go something like this

“You need to create a Expense Report form.  Users entering expenses will need to pick a valid project from your Line of Business system within the InfoPath form”

Check out these articles on how to create the BCS model and connect to your Line of Business system

Tobias’s Article on BCS

Now that you have a BCS system, lets display those fields within an InfoPath form

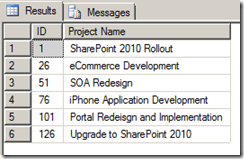
In my example, I have a simple SQL Table with a list of projects as shown below

image

We need to build an InfoPath form where users can pick one of the projects from this list.

My external content type in SharePoint Designer looks like this below

image

Notice the following properties ‘coz you will need them when you build your form in InfoPath

Name, Namespace, External System

Open up InfoPath 2010 and design a blank form

In the Home Tab, Under the Controls section choose the External Item Picker option under the input sub section and add it to the form

image

InfoPath will add a new group to the data fields with some properties.

Add the Field to the InfoPath form, right click and pull up the Properties for the external Item Picker

image

Enter the Namespace of your ECT , Name of the ECT and the System Instance Name(in our case it is CRM) into the required fields. <edit>Enter the Display Name of your field, otherwise you would only the see the identifier when you preview the form..</edit>

Note: After two hours of frustration, I found this to help finding information about the system instance name.  There is no help for the required fields and at first I couldnt figure out what the “System Instance Name” was.  Is it the name of the Finder ? Is it the name of the Entity? .   A search on MSDN retrieved the following article

MSDN System Instance Article

The System Instance name is a property of the SPBusinessDataField.  So to find out the property, I added the same field to a custom list and wrote some code as follows to retrieve the System Instance Name

image

The system Instance name was the same name as the external system property in SharePoint Designer.

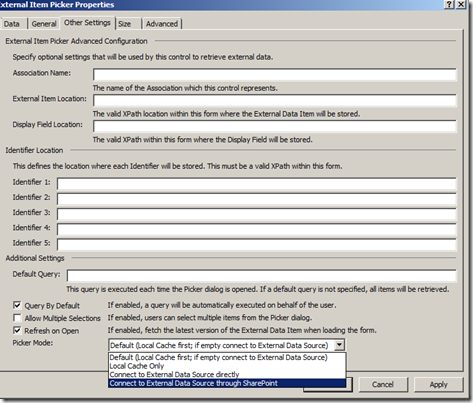
Click the Other Settings tab in Infopath and set the following properties.  Check the “Refresh on Open” option and select the dropdown for the picker mode to “Connect to external data through SharePoint”

image

Click Ok and Hit Form Preview. Now you can search for content in your LOB and surface them through InfoPath.  We will discuss saving this data to SharePoint in another post.

image